Saturday 28 August 2021

Transmission service

 Out with the old in with the new

This weekend I set about servicing the FMX transmission.

All the manuals suggest that the trans will take 10L of trans fluid. However, the pan only hold about 4L. I purchased a gasket and filter kit from Just Mustangs some weeks ago and purchased 3 x 4L of Penrite Type F trans fluid from my local Autobarn.

I jacked the car up onto axle stands so I could roll under the car and set about removing the pan from the bottom of the transmission. Fortunately, the new exhaust system was not in the way. 

I located a large tub to put under the pan so that when some of the screws were removed oil would simply drip down into the tub. There is no drain plug in the FMX transmission (unfortunately).

I was pleasantly surprised to find that the trans fluid was in good condition and nice and pink.

I cleaned up the pan, replaced the oil filter in the bottom of the trans and reinstalled the pan and re added about 4L of new trans fluid. Short of removing the transmission, there is no real way to get all the 10L of fluid out of the torque converter, coolant lines and trans. Given the fluid was in good condition, there was not need to go that that extreme. 

There was some sludge build up in the filter and bottom of the pan and this was all cleaned out. Similarly, there is no magnet in the bottom of the pan. So it was hard to tell if there were any metal fragments.

 Here is the old filter.


Here is the trans fluid I used.


I also replaced the coil and removed the 49 year old original one as the engine was developing a miss when warm. The resistance of the original coil was also too high for the electronic points I installed some weeks ago. So now the new coil is in, and no issues so far.

The next task is to replace the thermostat that will happen next week when the parts arrive.


Saturday 21 August 2021

Shakedown test drive

 Test drive during covid 19 lockdown 6.0 in Melbourne

After completing the spring install yesterday and the coil replacement last week. I had a need to go to Autobarn for a new thermostat, so took the Mustang for a spin the looong way all within my 5km radius of home.

Unfortunately, Autobarn dont stock the high flow 180deg F thermostat I was after. So will have to wait for next week to order and get the parts needed for the job. On the way home I look a scenic route and took a few pictures. The car is running a normal temperature of about 80deg c (176deg f). The temp outside is 18 deg and I have the larger 3 core radiator installed. While the thermostat seems to be doing the job correctly, I feel the need to replace it and the slightly rusty housing so limit issues down the road. 

Here are a few pics of the old girl out and about.


So not many jobs to do this weekend.. Just enjoy..


New front springs

 On the level.

I have been thinking about trying to level out the front of the Mustang as it looks like it sags in the bum a bit.

I ordered some new King springs from my local Autobarn. I was going to install some "low"pedders springs but they were out of stock so opted for some "low" King springs. King springs sell a standard, low and super low. I opted for the low's (KFFL-02) with the vide to take about 25mm or more out of the front.


It took me about an hour per side being super careful with my external spring compressors.

Once I have completed the left, the right was simpler as I knew what worked and what did not.

As the springs come supplied with a left and a right, I swapped them around and put the right in the left side of the car etc as the car is still left hand drive and they usually compensate for the driver.. 

Here is one of the original front springs.


The new ones are easier to install as they are slightly shorter (but stiffer). I was able to compress them while they were on the ground with an impact gun and socket rather than a spanner in place in the car.

Here is a pic of the car with the original springs

Here is one with the new springs.

The changes are subtle but the front it lower. The space from the ground to the wheel arch is about the same now.

Next task is to replace the engine thermostat and thermostat housing.


Wednesday 18 August 2021

Steering wheel repair

 Fixing the cracks.

Now that the car is registered, I have set about fixing some small issues that have popped up due to its age.

The 1st job was to fix the large cracks and missing pieces from the steering wheel. With time and heat, the plastic on the wheel tends to crack and the steel within the wheel does not move. Hence the large chunks and cracks in the wheel.

I used epoxy putty to fill the gaps and then painted the wheel to match the rest of the ginger trim.

Here is the wheel showing the cracks before I started.


Here is the repaired and painted wheel.


While doing a few other jobs and watching a number of videos of other 71-73 Mustangs, I discovered that the crash pad should be ginger on a car that has ginger trim. The crash pad in the car was black. 
I removed the dash pad and found that it is an after market crash pad with California Mustang embossed on the back. So I decided to have a go at painting the crash pad ginger.

It came up fairly well I think.
Here is a picture of the black one.

Here is the painted and installed crash pad.


I think the ginger colour looks better.


Wednesday 11 August 2021

Registration

 Happy registration day

Today was the last step in the registration process.

I took the car to Melton to visit the Mustang Club of Australia wester suburbs club permit guy.

As part of the process, the club needs to see the car, I need to sign the club permit agreement document and the club complete parts of the registration documents confirming that the car is eligible.

Once this task was complete I returned home and chased up the final piece of the puzzle being the VASS document that VicRoads needed for the registration.

The car has a VASS sticker attached to the B pillar.

I then trundled down to VicRoads here in Sunbury and submitted the paper work.

The paper work included:

  • VASS document
  • Club permit document
  • Vehicle eligibility document
  • Proof of ownership
  • Drivers licence
  • Australian import document to show the car was imported

Once all these were copied at VicRoads they issued the club permit plates and logbook and VicRoads were paid $194.10 for the privilege.

The deal with the log book is that I can use the car 90 days in a given calendar year. So just short of twice a week. The book needs to be filled in each time the car is driven to be legal and fines can be issued if the book is not completed.

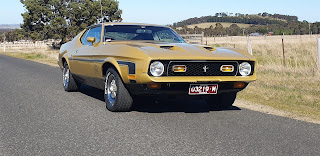
Here is a quick pic of the car with the plates installed. Now I just need to wait for Covid lockdown 6.0 to finish. Then we can go cruising.


Happy days...


Tuesday 10 August 2021

Roadworthy

 Last few steps to getting registered.

Today I completed another milestone in the process to get the Mustang registered.

The roadworthy tester that I used to do the pre check is in Riddells Creek. Melbourne is in Covid lockdown v6.0. Riddells Creek was released from lockdown yesterday. As car mechanics are classified as essential, I could still get the roadworthy completed, but technically, as part of lockdown, I can only travel 5km and Riddells Creek is 20km away. The key issue is that my unregistered permit for the car to complete tasks to get the car ready for registration ends on the 18th of August (in 8 days). With this in mind, I decided to take the car to Riddells Creek and just drop it off for the roadworthy. Fortunately, the bike fits in the back of the car on the fold down rear seat, so the plan was to ride home from Riddells Creek via Gisborne to ensure a safe route.

So I dropped the car off, pulled the bike from the back and set off..


About 3 hours later they called and advised that the roadworthy was completed.

A short drive to Riddells Creek, I picked up the car and headed home without issue.

Next step is to go to Melton to see the Club registration person to sing some club permit documents and then off to VicRoads for registration. Fortunately, I can still go to VicRoads during lockdown.

Sunday 8 August 2021

Carburettor Rebuild

 New kit for the Motorcraft 2100 series 2v carby

The job list for this weekend has 3 tasks. 

  • Rebuild the carby and add / replace the fuel filters
  • Grease the upper front wishbone bushes
  • Move the Oil pressure, Engine temp and tacho gauges as they are hard to see.

First up is the carby. 

The poor old carby looks very second had and very grimy. There is a significant amount of carbon build up on the carby and the vacuum port on the inlet manifold.


I took a number of pictures during the disassembly process.


The warm air line that goes from the inlet manifold to the coke was badly rusted so I have removed it and not reinstalled it.

After 3 cans of carby clean and a can of brake clean, then cleaning and reassembly, the carby looks and more importantly, works much better.


Once all the glamor shots were taken, the carby was reinstalled and after a bit of cranking to fill the fuel bowls, the engine fired up and now runs really nicely.

Next job to grease the front end.

As the standard upper arms just have blanks in the place of grease nipples, I purchased some right angle grease nipples and installed them to grease the front end. This fixed the problem instantly.


As I was only able to purchase 2 right angle grease nipples, I removed the plugs, installed the nipple and then greased the joint, then removed the nipple and moved on to the next one. I greased the top and bottom ball joints while I was at it.

Then finally, I moved the 3 gauges from under the dash to under the heater controls. While the original location meant that they were out of the way, the issue was that they were too far out of the way and the steering wheel blocked the view. The left gauge is the tacho and illuminates when the car is running.

The new location is much better.


While in Knoxfield, I stopped by the VASS guys place to pick up the VASS stocker. This has been placed on the car and I await the paperwork for the VASS from him. This will be done this week.

That then brings me to the end of tasks for the roadworthy. I have booked the car in to get a roadworthy on Tuesday this week. Then I need to take the car to the Mustang Club registration coordinator in Melton and then onto Vicroads to register it.


Tune to Cleveland Radio on the 351 band

 New Exhaust.

As part of the roadworthy tasks, the exhaust system from the factory cast headers to the back of the car needed to be placed.

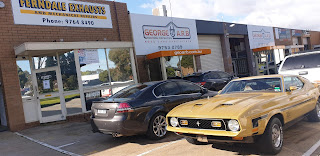
For this task, I enlisted the help of a old friend Chris as Ferndale Exhausts.

I took the car to Knoxfield and left it with Chris with the instructions to replace the factory single system with a twin system and add XA / XB GT Falcon exhaust tips for good measure.

As I did not want to alter the factory stone tray, I opted for the tips to be set up just below the stone tray.

One day, if I can get a second hand stone tray, I may modify it and make cut outs for the exhaust. For now it looks and more importantly sounds great.

The twin system should help the big 351 to breath a bit better.


While driving to and front Knoxfield I experienced some engine issues where it developed a miss. I suspect that the issue is fuel starvation, so have purchased a carburettor rebuild kit for the factory Motorcraft 2100 series carby. Also, while on the return drive from Knoxfield, the front end developed a familiar squeak. Both jobs are tasks for this weekend. 


Engine flooding / running rich issue.

Engine flooding / running rich issue. I have been chasing an intermitant issue with my Motorcraft 4300 (square bore) for a few months now. I...