Saturday 24 April 2021

Front end day

 A few more jobs done

Today was front end day.. I needed to replace the spring saddles, front shock absorbers and complete those pesky castor rod bushes.

The day started with replacing the very rusty battery tray. Fortunately, the metal work under the tray was fine with no rust, only the battery tray. Tow of the 3 bolts holding what was left of the tray in place were very rusty and would not budge. So I turned to the angle grinder for help. Once the tops were cut off, the tray came free fairly easily. Then the next challenge was to remove what was left of the bolts. I ended up drilling out the centre of the remainder of the bolts and then with multigrips from below, I managed to remove the remainder of the bolts. Then a quick trip to Just Mustangs in Riddell's Creek to get some replacement bolts.. Fortunately, Russell had what I needed in stock. Once back home, the work was simple to install the new battery tray and make the battery secure..

The next job of the day was the front shock absorbers and coil spring saddles. Fortunately, for this job I was able to loan a centre shaft spring compressor from Just Mustangs.


I then removed the top mounts of the shock absorbers and removed the shock absorbers.


Then with the spring compressor I was able to remove and replace the saddle. The first one took about 5 times longer than the second one as I had learnt a few lessons on the way. The rubbers of the shockers were cracked and the shockers had failed.


The old saddles were also toast.

Then once the saddles were replaced, the new shockers were installed.


Then finally the job was done.


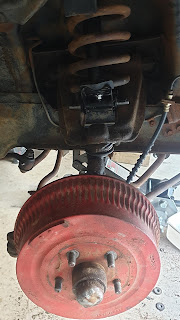
Im not sure why the front right drum is red and the left is just a rusty colour. Perhaps one of them was replaced at some point.

Then onto the castor bushes. I removed the castor rods and then set to using a dremel tool with a burr / cutting bit on the end to remove the flange that was holding the assembly together.


This picture shows the inner shaft within the main shaft holding the bushes in place.

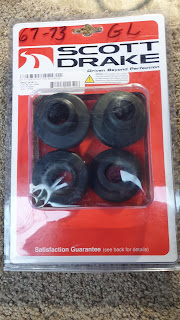
These are the new bushes.

Here is a comparison between the old and the new. The right side was ok, but the left showed signs of cracking.

Once the bushes had been replaced, all was reassembeled.

Thats a few more jobs off the list.
The main jobs yet to be done are:
  • Replace the rear and front right wheel cylinders, replace the diff rubber brake line (the fronts look to have been done recently), flush the brake lines and reassemble.
  • Replace the gearbox output shaft
  • Replace the exhaust system
  • Replace the seat belts
  • Repair the rust in the bottom of the quarters.
All of the brake work can be done in one day.
I will arrange to get an output shaft seat locally and replace it. Then look to head out to Braeside to get new brown / ginger seatbelts made.
Once done, off to see Chris at Ferndale Exhausts to replace the exhaust system.
Then the last and the most challenging job, is to fix the rust in the bottom of the rear quarters.

Till next time..


Sunday 18 April 2021

A bit of a diversion

 All Ford Day Geelong.

Today I went down to Geelong for the All Ford Day. This time it was held in Eastern Park Geelong. It has not been on for over 24 months due to Covid.

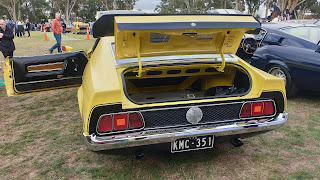
Here are some pictures of 71 to 73 Mustangs at the day.

71 M code. Originally White.


Converted to RHD

71 Boss 351 - Grabber Green


71 Boss 351. Converted to RHD


71 H code Jade Green with argent and green trim.


Am now even more enthused to get my car on the road.
Next job.. Finish the castor rod bushes.

Saturday 17 April 2021

Engine mount and front sway bar mounts

 Finally engine mount done.

After a week or so of messing around with the right engine mount, I finally got it in.

I first bought a reproduction engine mount and found the bolt holes were different and poorly made. I went back to where I purchased the mount from and had it replaced. 

Today I tried to install the replacement mount.. Still no joy!.. The bolt holes were better but the mount that connects to the body was not right and the holes did not line up. After loosening the saddle on the cross member to see if they would help with no luck, I gave up and went to my local Autobarn and purchased a XY / XA / XB engine mount. This one looked much better.

I returned home and bam.. Installed first go with no issues. Must have been a crappy pressing.

Fortunately, the left engine mount had already been replaced.

While I was under the car, I replaced the front sway bar pivot bolts and bushes. One of the bolts was bent and some of the bushes has started to fail. So thats another job done.

I also made a start on the castor rod bushes. But, as per an earlier update, they are pressed in. I cant get an angle grinder into the tight space, so need to come up with a better idea as to how to cut the lip off the old ones to enable them to come free.


I'm off to the All Ford Day tomorrow in Geelong to check out other Mustangs. So no work on the car tomorrow, unless I come home early..

Stay tuned.


Friday 16 April 2021

Issue with windscreen washer water pipe resolved

 Its all about the bung.

After a quick run down to the local Autobarn to pick up some vacuum hose / washer water hose, I decided to tackle the issue of the broken washer water pipe that goes through the bonnet and then into a 3 way pipe.

At first you would wonder.. Why did they do that?? When the pipe enters the bonnet and then exist through a larger hole not 20mm away. 

Well, it is all in the rubber seal that runs along the top of the firewall. It seems that the engine bay is sealed between the body and the bonnet along the back of the bonnet.

The design of the 71-73 Mustang bonnet hides the windscreen wipers and washer squirt nozzles.  As there is a need to have the nozzles on the underside of the bonnet behind the rubber seal, then the need to get the pipe out there then makes sense. The rubber seal can be seen in the 1st picture and it can also be seen where it is rubbing on the bonnet.

Here is a picture of the underside of the bonnet with the rubber bung and no pipe.


Due to heat under the bonnet the rubber pipe was melted into the bung. So it was not as simple as just pulling the pipe and installing another. I managed to extract the remainder of the pipe and the bung.

I then had to cut the old pipe from the bung, being careful to not damage the bung.

I then used some detergent to install the pipe. I then tried to reinstall the bung with the pipe installed. After some trying, I figured this was not going to work. So I removed the pipe, installed the bung with some needle nose pliers being careful to not put a hole in the bung. Then with some more detergent, I pushed the pipe through the bung into the cavity of the bonnet. Fortunately, it was relatively easy to grab the end of the pipe and reinstall it on the 3 way adapter.

Here are a few pics of the new pipe and old bung reinstalled. 

There is a straight through connector on the pipe near the wiper motor to enable the bonnet to be removed and not needing to cut the pipe.


The next job is to complete the engine mount install and castor rob bush install.

Stay tuned. 

Monday 12 April 2021

The great seat belt fact finding mission

 What is factory and what is not. Thats the question!

As I need to replace the seatbelts or at least upgrade them to be Australian compliant, I'm keen to find out what the Mustang "should" have in it.

I posted on one of the forums and asked the question as the drivers belt is different to the other 3.

The suggestion / reply seemed to be that the round one was correct and the other 3 incorrect. That seems a bit odd to me so I went searching. I came across this video on YouTube that describes the different belts over the years in Mustangs and Cougars. (https://www.youtube.com/watch?v=reUlxy7Vr48). Per the video, he suggests that the back seat belts on the fastback rear seat changed to retractable in mid 1972. (11.55min) As my car is a July 1972 car, It seems to have the retractable rear belts. He also suggests that the plastic bezel that clips into the plastic panel is broken most of the time. My car has both of these bezels in place. So the belt does not disappear.

The shoulder straps per the video at the 10.35min point are the same as mine and the small plastic bushing is still in place.

Per the video it has the plastic cases at 12.35. Both of mine are in great condition.

Then at 13.25 he gets to the buckles that are in the passenger seat and the rear seats. He suggests that they started using them in 1973(?). Mine are in fairly good condition. I have done some checking and the passenger shoulder belt clip is different to the driver side. I tend to think that the driver side set as been changed. The passenger side has a wire to the retractor, to detect is the belt is on or not. The wire on the drivers side is sitting on the floor. So I suspect that the drivers side has been changed out for an earlier version. 

Also of note, the only straps in the car the car that seem to be ginger in colour are the 2 shoulder straps. The rest seem to be black.

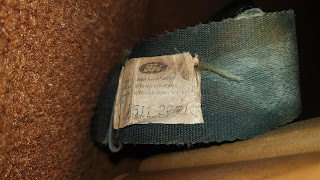
While checking the belts, I found a number of tags still on the belts. They are below. The tags on the shoulder straps are gone, but the tags on the rest are in tact and are below. 

I have listed where they are in the car per below.

Back of front passenger side buckle. The number near the belt is 56


Front passenger side shoulder and lap belts. Note the push is still in place. It looks to be brittle but still in place. The lap belt appears to be black and the shoulder belt is a faded brown (Ginger).


Rear passenger side belts

This is the back right seat buckle that has a date code of M2572. So this would suggest the wreath / square style belt is correct for this car.
This is the back on the right side buckle in the back and has a number 67 on it??

This is the back left buckle and has the same date code as the right one being M2572.

This is the left side back seat belt buckle this has a number 62 on it.

This is the front of the back right buckle.

This is the left side lap belt retracted. It has  a code S225 and a date code of M2572


This is the front drivers side lap belt. It has a tag code number of R511 and a date code of 2071. This belt is black.


This is the passenger side centre belt buckle. it has a code of R551 date 2672. This belt is black.

This is the retractor for the front passenger side with the wire plugged into the back. The fasten seat belt on the dash works if someone is sitting in the seat and not put the belt on when the car is started. This belt is black.

This is the lap belt for the passenger side. This belt is black and the date code matches the buckle in the middle of the car on this side. Code R551 and date code 2672.

This is the lap belt and shoulder buckle for the drivers side. This has a different buckle. I suspect the driver side has been changed at some point. The catch size and buckle is different to the passenger side. Again, the shoulder strap is brown / faded ginger and the lap belt is black.

This is the driver side lap belt date code. The code is different to the other side in that it is R511 and the date code is 2071. This suggests that the drivers side set is from 71 and the rest is mid 72.

This is the retractor from the drivers side. This is a different design and there is no where for the wire to plug into. This also gives more suggestions that the drivers side has been changed. But only the lap belt and buckle.


This is the buckle in the rear seat. Again code 225 and date code M2572

I then checked the shoulder belts for both sides. As these are the only belts that are ginger, I figured they must be the same and have not been changed. Unfortunately the date tags are missing as they are normally at the top of the belts and they are faded. Looking at both belts, apart from the broken plastic and the elastic that has gone hard. The shoulder buckle is the same on both sides and connects to the earlier and later lap belts. Hence I think they are original.


So now the dilemma is.. I need to change the belt material in the car. Do I just take out the original belts and store them and buy new belts and install. Or do I use the hardware I have and see if I can find a replacement lap belt set up for the drivers side that is the same as the rest and get them all remade to Australian standards. 
At the end of the day, I cant use these belts as the car is not roadworthy with them. So I need to do something. I don't like the lift buckle replacements that are available. 

I will do some searching to see if I can find a old set of the correct belts for the car from the US and get them remade and keep the period correct ones for the car.. 

Oh the dilemma. 

Engine flooding / running rich issue.

Engine flooding / running rich issue. I have been chasing an intermitant issue with my Motorcraft 4300 (square bore) for a few months now. I...