Saturday, 6 August 2022

Mustang club run to Winton for the historics

 Mustang Club Run

In August the Mustang club arranged a run to the Winton Historics.

It was a 2 day event, however the forecast weather for Saturday was fairly poor.

I decided I would just go for the day on Sunday.

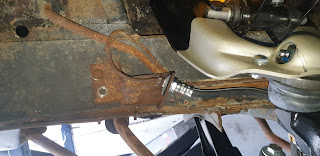
The run up was fairly uneventful if you dont count the fact that I broke the hand brake / emergency brake cable when I pulled up for fuel at Bunker hill. A quick repair / tie up the lose ends under the car job was done and I was on my way.

I arrived at around 9:30 and parked up with the rest of the club cars. Only a fairly small contingent was there but nice to meet new faces all the same. As I expected mine was the only 71-73 amongst mostly new / modern mustangs.


There were a number of Mustangs and old falcons racing on the day


We got to do a number of parade laps of the circuit.

Here are a few pics.


I have some video of the day that I will upload and share at some point.

Friday, 4 February 2022

Alternator rebuild

 Noisy bearings and squealing belt

Recently I noticed that the alternator was getting noisy when the engine was cold.

I decided to replace the bearings and bushes in the unit.

Looking at the date code of the alternator I found that it is not the original one and is now a 60A one made in 1979. I figured I would keep using it as it was replaced at some point perhaps due to a defect.

Here are a few pictures before I disassembled and cleaned the unit.


I then replaced the bearings and sand blasted the pulley, fan and casing. Then painted the pulley and fan black and the casing satin clear.

Old brushes and bearing


Fully disassembled


Painted and reassembled.


Still waiting on a rebuild 4300 Motorcraft 4 barrel carb to enable the install of the 4 barrel inlet manifold.


Saturday, 18 December 2021

Time to make the cleveland breathe

 More air

The next step to free up the big 351 cleveland is to convert it from the factory 2 barrel motorcraft 2100 2 barrel carburettor to a 4 barrel 4300 series carburettor.

Here is the standard H code 2 barrel 2100 series carb.


Here is the standard 4 barrel 4300 series carb.


The factory small port 2 dot heads are more then good enough for what I need and tests prove that for street performance the small ports heads flow more then enough. The large port 4 dot heads were more for high performance race situations.

In order to complete the conversion, I had 3 options in terms of inlet manifold to match the small port heads. Option 1 was to source an Australian cast (in 1973) 4 barrel small port square bore inlet manifold, option 2 was the similar small port spread more manifold cast in Australia in 1976, and then finally option 3 to source an after market manifold.

As I wanted to maintain a stock look, I managed to source a small port 1973 aussie cast manifold from late XA / early XB GT falcons. Most were going for more than $700 on ebay and facebook. While the spread bore units are easy to obtain and cheap. I managed to find the 1973 square more version locally for $100.. A real bargain.

The first step was to sand blast the manifold to clean up all the old paint.


Once I sand blasted the manifold, I cleaned it up and the sourced high temp engine paint to closely match the original engine paint colour. While Autobarn and Supercheap have a number of different ford engine blue colours, I went to GT Ford Performance in Nidrie to source the right colour. There was a choice if 2 colours. Dark blue like XW / XY and a lighter blue to suite late XA and XB GT's. I chose the lighter blue as it is much closer to the factory colour.


The next step will probably be to remove the rocker covers and air cleaner and sand blast them and repaint as they are looking a bit dagy.

I have ordered a 4300 Motor craft carb from a specialist in Echuca that will come rebuilt and like new with all the right linkages etc installed.

To complete the factory install look, the fuel line from the fuel pump to the carb needs to be replaced and the inlet port on the 4300 carb is in a different side.
Fortunately this was a simple purchase from Griffs in Ballarat.

Now to wait for the carb to be supplied in the new year and complete the replacement of the inlet manifold.

Stay tuned.


Brake conversion complete

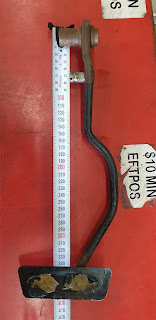
 Pedal Modification Complete

The last piece of the puzzle in terms of brake conversion was completed with the pedal modification completed by a local engineering company and a quick $50.


Modified pedal


Here is a comparison between the 2 types of pedal.


Then the booster and master cylinder was installed with new brake lines to the distribution block.


Next step.. Improve the induction issue and convert from 2 barrel to 4 barrel.


Sunday, 14 November 2021

Drum to disk brake conversion

Time for better stopping power

The Mach 1 came from the factory with non power assist drum brakes. While they work fine, the non power assist is a little unnerving.

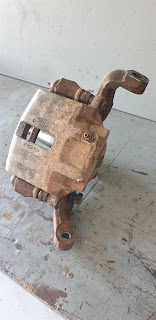
While there are complete kits to convert the car from drum to disk, most kits did not have the 71-73 style booster. So I opted to buy just the correct style booster and source spindles locally from a 1986 XF Falcon. The XF Falcon has aluminium Girlock single piston callipers.

Here are the second hand callipers before I sand blasted them and painted the callipers with clear and the spindles with black paint.


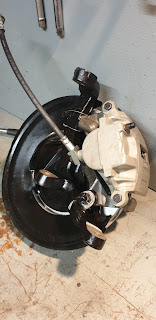
Here are the callipers and spindles after being reconditioned.


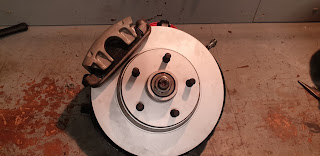
I then purchased new upper and lower control arms and installed those along with the new disk front end.
First here is the old set up.


Then in with the new


I found that the XF Falcon, and all other brake lines were too short to reach from the back of the spindle to the front where the standard brake lines were installed. So I used the factory brake line bracket and turned it around and bent the brake line to meet the new rubber brake line.


Then it was time to install the new booster and master cylinder.
The next problem found is that the brake pedal mounting point for the booster rod is different to the one with no booster. So I'm currently sourcing a new pedal or will get the local engineering place to add a pin to the right location.


Once I source a new pedal or modify the current one, then the last step is to bleed the brakes and get the front end alignment done again.


The final piece to the AC puzzle

 The last push to finish the AC install. Now that all the engine bay work is done. The next step is to replace the heater box. Also, I have ...